info@biomedres.us
+1 (502) 904-2126
One Westbrook Corporate Center, Suite 300, Westchester, IL 60154, USA
Site Map

Received: June 02, 2017; Published: June 14, 2017
Corresponding author: Dr Muhammad Ahmad, Plastic & Hair Restorative Surgeon, Aesthetic Plastic Surgery @ Hair Transplant Institute, Islamabad, Pakistan
DOI: 10.26717/BJSTR.2017.01.000129
The use of photography for medical documentation is vital [1]. Hair restoration procedures are among those which require a proper, up-todate documentation of the pre-operative and post-operative results because of various reasons. The time to see the result spans over months and the ongoing hair loss process makes it even more necessary to maintain a proper photographic record, the photo documentation is an integral part in clinical, communications, educational, legal and research aid. The non-standardized photographs diminish the significance of the clinical result [2].
The modern day digital cameras have become the cameras of choice for amateur and professional photographers. These can produce outstanding photographs with good details. There are various good camera manufacturing companies (like Sony, Nikon, Canon) which manufacturers SLR or DSLR cameras. There are certain details which the hair restorative surgeon should be aware of. The include the ISO, focal length, aperture, shutter speed etc. these can be set to ‘automatic’ mode or ‘manual’ mode. Lighting is one of the most important factors while taking a photograph. A photograph taken with a good light at a proper distance produces the best result.
There are various articles which mention the standardization of the photographs [3-5]. The author in the present article presents his personal modifications which are not very costly and can produce the wonderful photographs [6].
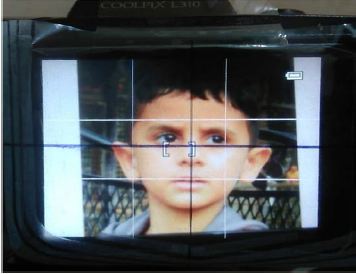
Figure 1: Making of ‘gridlines’.
Normally the cameras with ‘gridline’ options are costly. These gridlines can be made by marking ‘one’ vertical line and ‘one’ horizontal line on a cellophane tape /adhesive paper with a permanent marker (Figure 1). It can be fixed on the viewing screen of the digital camera [7]. The lines are taken in consideration while taking the photographs to maintain the proper position, angle, view [7].
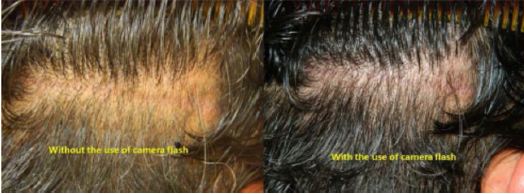
Figure 2: Photos with and without camera flash.
Camera flash is used at most of the times but it produces a reflection of the side. The part in front of the flash looks very bright whereas the part on the other side of the flash looks very dark (Figure 2). In hair transplant surgery, the use of flash light actually augments the hair volume due to reflection created by the hair which are in front of the camera. Many surgeons use separate photographic rooms and it becomes quite difficult to take standardized photographs in operating room. The author uses a custom-made reflector which is very cheap and made by an insulin syringe and a few rubber bands. A reflector surface is placed in front of the flash which diffuses the light in all directions (Figure 3).
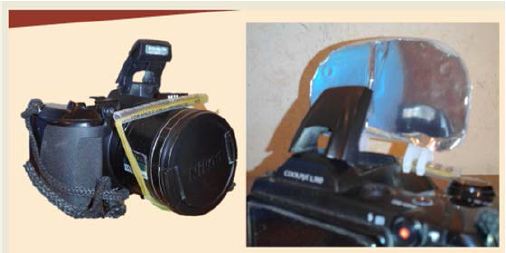
Figure 3: Customized flash reflector.
Microphotography is an integral part of the hair restoration procedure. The estimation of donor area density by microphotography is of utmost value nowadays. The hand held microscope are very costly. The author has designed a customized microscopic extension for smart phone. A lense with a low diopter power is taken and placed in front of the camera. The photograph is taken with a proper lighting (Figure 4). A much closer photo is also taken by changing the lense. The video can also be made which shows the area in much higher resolution (Video 1). It is also very helpful while taking the photographs f donor area during FUT and in scar assessment of FUT or FUE.

Figure 4: Microphotography.
The innovations in the routine practice help to expand the options for medical photography. These innovations are not very costly but can help a lot.